

QuickBooks’ data damage is usually encountered when users come across while formatting one or more pages that might have been damaged. The reasons for this failure can be performance failure, disk failure or power surge.
What is Data Damage in QuickBooks Desktop Company File?
Damage in the QuickBooks desktop can be the main problem that might arise in this software and cause issues. It becomes highly important to understand the small things that can trigger damage or corruption in the company files. Thus it becomes quite imperative to fix data damage on the QuickBooks desktop company file.
Signs to identify data damage in QuickBooks company file
Here are some of the ways to identify the data damage in QuickBooks:
- There will be a negative balance in the transaction history.
- The paid bills or invoice might be showing unpaid.
- Software might have shut down suddenly.
- Balance sheets may be erroneous.
- You might have opened Send Feedback Online while moving the Bug Report Window.
Also Read: How to Fixing QuickBooks Error 106: Troubleshooting
Reasons for the occurrence of the data damage in the QuickBooks desktop
There may be virus attacks to the hard drive stored on the database.
- The data file might have expanded beyond the prescribed limit.
- There might be a sudden drop in the power and it might have trashed the entire hard drive.
- System might be running out of resources like RAM, Virtual memory, network interface cards.
- The system might have shut down abruptly.
- Before proceeding to fix data damage on the QuickBooks desktop company file, keep these things in mind:
- You must run the rebuild and verify data utilities on your system which shows data damage.
- Create Backup of the file.
- Save the file to the convenient location.
How to fix data damage on the QuickBooks desktop company file?
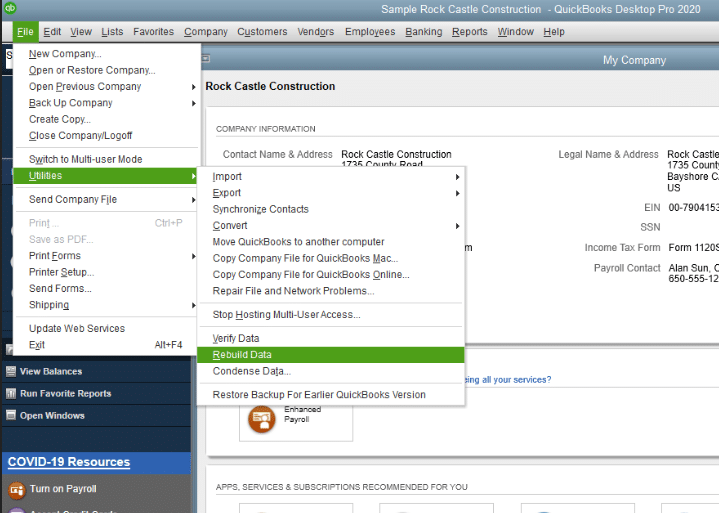
Step 1: Running the rebuild data utility.
- Begin with Opening QuickBooks.
- Go to the file menu and reach the Utilities option.
- Move to the ‘rebuild data’ tab.
- Click OK on the backup option.

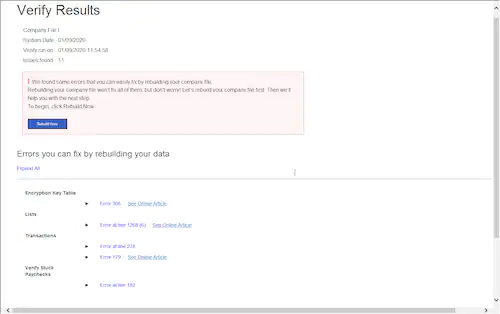
Step 2: Running verify data utility.
- Open file menu in QuickBooks.
- Go to utilities followed by choosing the verify data option.
- Click ok on ‘QuickBooks detected no problem with your data’ message.
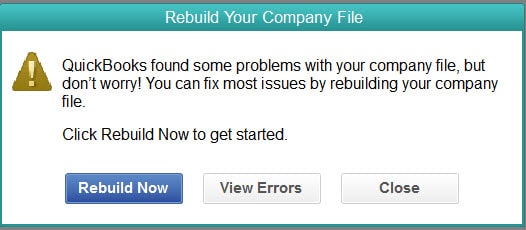
- If there is some problem with the data, click on Rebuild now.
Also Read: Learn to resolve QuickBooks POS Error 193
Step 3: Using Rebuild Data tool
Rebuild data tool can be used to fix data damage in Quickbooks. This will fix the company file issues. The steps to use Rebuild data tool:
- Start with, reach the file menu and then move to the utilities tab.
- Move to the rebuild data option.
- On the QuickBooks information window, press OK, follow the onscreen steps.
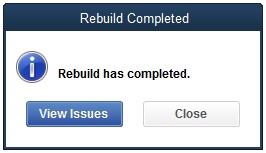
- Now, the tool will repair the file and this process might take some time.
- You will see the rebuild has completed on the screen, press OK.
- Now from the file menu of the QuickBooks, proceed to the verify data option is utilities option.
- Check for the file data issues.
Step 4: Using QuickBooks file doctor tool
- If the QuickBooks tool hub is not downloaded, then you need to download and install QuickBooks tool hub.
- Now, you need to open the company file issues tab in the QuickBooks tool hub.
- Now, you have to run QuickBooks file doctor tool.
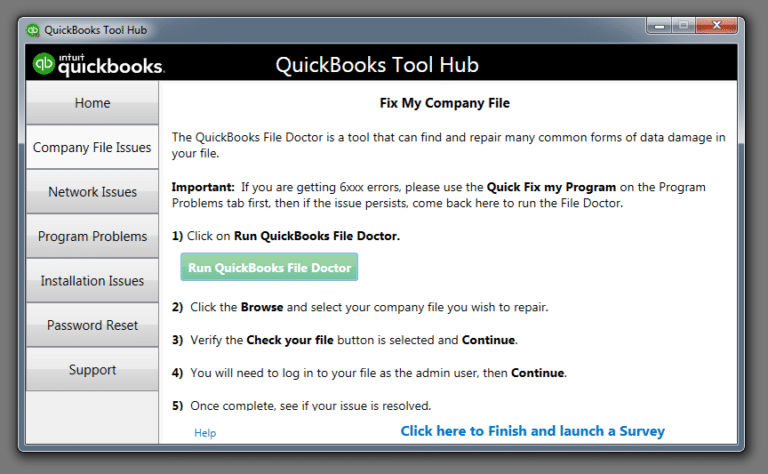
- From the tool, you have to choose the company file in the drop down menu.
- You can browse if the file is not identified and then choose the check your file option.
- Click on Continue.
- Finally, enter the admin password for Quickbooks.
Also Read: Resolve QuickBooks Unexpected Error 5
Step 5: Deleting Customer Reports and Memorized Transactions
For deleting the memorized reports:
- Move to the lists option and here you have to go to the Memorized transactions option.
- Now, move to the Edit option and then opt for Deleting the memorized transaction.
- Click Ok
- For Deleting Customer Reports:
- This step requires you to move to the reports option followed by selecting Reports centre.
- From here, choose the reports that are to be deleted.
- Click OK.
For fixing data damage on the QuickBooks desktop company file for Mac:
If you are using QuickBooks mac, then follow these steps to fix data damage on the QuickBooks desktop company file:
- Resort-files to put the records back in order.
- From the company and financial balance sheet detail, Identify the problem.
- Backup the company file and then delete or you need to re-enter the transactions.
- Next, you have to check the specific accounts for uncategorized and categorized expenses.
- Finally, merge the damaged accounts or items followed by deleting memorized transactions and customer reports.
You might have now fixed the data damage issue in your QuickBooks. But if you feel that you might need help in resolving data damage issues in the QuickBooks, reach out to QBS Solved at 1-888-910-1619.