

QuickBooks is a financial software which customized all the accounting tasks in a systematic manner. It helps you in managing your reports and creating records, generating invoices etc. But, you may see several errors at times. QuickBooks experience the Failed to Send Usage Data Error by the following causes of this issue include: When you enter the wrong time zone into a computer or laptop. Additionally, if the user makes a duplicate of an Accountant.
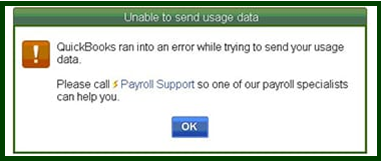
What is the QuickBooks Error “Failed to send usage data”?
QuickBooks users often see sending data usage errors while using QuickBooks payroll. In order to complete the payroll tax filings you need to send the data to the payroll service. And while doing so, you may see an error message “QuickBooks has encountered a problem sending your data”. Occurrence of this error interrupts the QuickBooks payroll connection with the online services. QuickBooks Error “Failed to send usage data” is an payroll update error.
Also Read : QuickBooks tls Error Online Internet Explorer Security
Things to remember before fixing Quickbooks error “failed to send usage data”
- You must use internet explorer to access Quickbooks online payroll.
- Also you must delete the temporary internet files and website files before trying to send the payroll data.
- If there are some internet issues, you should try to reset the router and then restart the process.
- Ensure to update the Quickbooks software and Quickbooks payroll services.
Reasons for the QuickBooks sending usage data error
- The date and time on your system may be incorrect.
- An accountant’s file may already be present in Quickbooks.
- Browsers might use invalid security certificates.
- Network timeout error.
- Multi-user mode being used.
Why does Error- ‘Failed to send usage data’ occur?
- This error may occur when the time zone of your system is incorrect.
- It may also happen when the user creates an accountant’s copy.
Methods to resolve QuickBooks Error “Failed to send usage data“
Solution 1: By editing your payroll service key.
- First of all, you need to go to the ‘Employees’ tab in the QuickBooks and select ‘My payroll Service’ from there.
- Next, you have to click on the ‘Manage your Service key’.
- You have to click on the Edit option and follow the steps.
- Check mark the dialog box which appears and click on Finish.
- Once this is done, go to the main settings page and select the ‘Employees’ tab again.
- Reach to My payroll service option and click on send usage data.
Also Read: How to set up QuickBooks Workforce
Solution2: checking the date and time of the file location in your system.
For windows 7:
- Switch on your computer system and go to date and time icon on the right-bottom corner of your system and you have to change the date and time
- If you are unable to do it from there, then go to the control panel and select the Clock, language or region option to change the date and time.
- Make a click on this change date and time option and change the date and time and also the time zone.
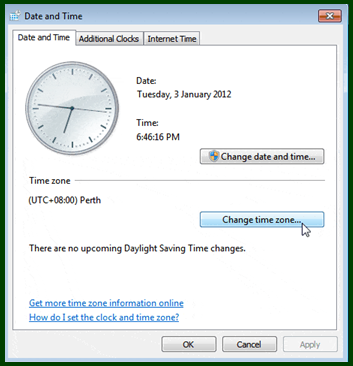
- Then click on OK and verify that the time and date are set correctly.
For windows 8:
- Go to the control panel and select the tab of Clock, language and region.
- Now, you have to click on the Set Date & Time tab and then choose the option of change date and time and make the required changes.
- Click Ok to save the changes.
Solution 3: Making sure if there is an accountant’s copy.
- If there is an accountant’s copy created, then you will have to make the changes manually to it or you can wait for the Accountant’s copy to be returned.
- After that, you have to send the data to intuit.
- Now, you have to delete all the online transactions, if the error still persists.
- Next, go to the Edit option from the menu bar and press ctrl+F together.
- Herein, reach to the advanced tab and in the filter box, you need to carry the following steps:
- Go to the drop down menu and select the filter detail level.
- Choose the option of ‘Summary only’, and from the drop down again, select the option of ‘Filter online status’ and select to send ‘Online’.
- Now, from the given drop down select the option of Filter postimg status and also choose ‘Filter’ option.
- Now, you need to locate and click on the ‘Find’ button in the find screen.
- If you see any non-payroll transaction, then you have to complete the processing.
- If you find paychecks, then remove them and try to send them again to Intuit.
With this we come to the end of the article!! Hopefully, you are now able to fix this issue. If you still feel that you need assistance, you can reach out to us at +1(888) 910 1619 and our technical support team will be happy to assist you!!
Also Read:
QuickBooks Error PS107 – Unreadable Internal File
QuickBooks Payroll Error 30159?