

- Reach the Journal Entry feature available in QuickBooks online.
- Enter the date and the journal number.
- In the category column, you should enter the correct accounts.
- You should enter the debit and credit amounts till the entry is balanced.
- You must add a description followed by saving it.
Managing the business account is a complicated task, even if you are using QuickBooks . It becomes extremely important to learn some basic things about QuickBooks , so that you are able to understand some basic features of the QuickBooks . In QuickBooks online, you might not be aware about the usage of journal entry. A Journal Entry is a transaction which is entered to the business’s general ledger.
Here is an article that will provide you a gist of Journal entry and help you to enter the journal entry in QuickBooks online. Stay tuned till the end.
Brief about QuickBooks Journal Entry
Usually, QuickBooks will record the transactions as they occur on their own- You can record an invoice, sale receipt, bill, check and more. QuickBooks will by default put this data into the general ledger.
If the transactions are to be entered manually, like for correcting an error. In this case you have to use the journal entry feature in QuickBooks online. For QuickBooks journal entry, it should be balanced, any debit that is done should have a corresponding credit.
How can QuickBooks Journal Entry be recorded?
Here are the steps for recording a journal Entry in QuickBooks online. Here we will take prepaid insurance as an example.
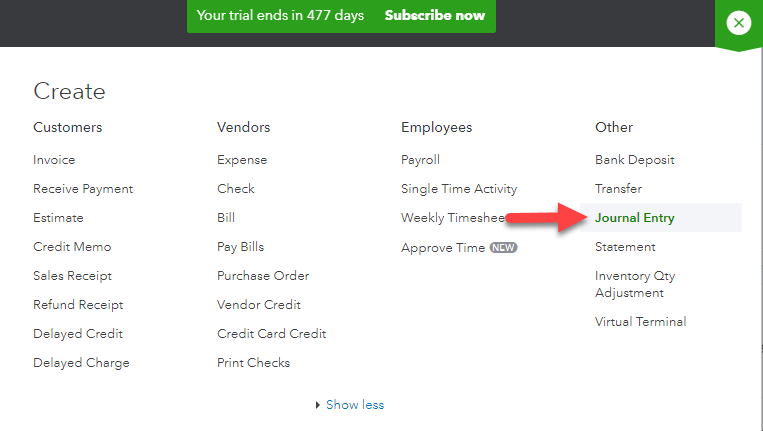
Step 1: Navigating the Journal Entry Feature
To begin with, you should navigate to the QuickBooks online section of Journal Entries. Click on the + icon on the right side of the file. Here you will see a dropdown- “Create” that lists Journal Entry.
Once you reach the journal entry tab, you will be redirected to enter the necessary details.
Step 2: Enter the details
The QuickBooks ’ Journal Entry form is quite simple. Once the form is brought up, then you should edit the journal date. Here QuickBooks will pull the current date itself. If the entry is from the previous date, then you should enter the date correctly.
Step 3: Entering the Correct Accounts in Column- Category
Here we are creating a journal entry from prepaid rental insurance. Since rental insurance is usually prepaid on monthly and yearly basis, therefore it is considered an other current asset
With this in mind, we will add two accounts in the category column. The first account from the chart of accounts is – Company checking account. This account loses money when the rental insurance is paid. The second account is the Prepaid insurance account that will gain money since it is benign used to prepay your insurance. Thus there will be two accounts, one to credit and one to debit.
Also Read: Resolve QuickBooks Unexpected Error 5
Step 4: Entering the amounts
Once the correct accounts are pulled, you will see the corresponding debits and credits. For instance, the rental insurance costs $1200, so you will add a credit to the checking account and a debit will be added to the prepaid insurance account.
The journal entry is always balanced. The column at the debit side should balance the credit column. If the multiple payments are listed, you should ensure that the debits and credits are equal at the end of the entry.
Step 5: Adding a description
Finally, to finish the QuickBooks journal entry, you should add a description. The description elaborates that the journal entry is prepaying for the rental insurance. Once the description is filled, you must save the entry and close it.
Thus, it is quite simple to record a journal entry in the QuickBooks online. Having said this, QuickBooks journal entry is the simplest example of double entry accounting. Debit at one column is always a credit at another.
For instance, a customer invoice debits the account receivable and credits revenue. Thus, whatever transactions you enter in QuickBooks online, a journal entry is going behind the scenes.
How are transactions posted in QuickBooks online?
QuickBooks pulls the data which is necessary to add a transaction to the general ledger automatically. Let us see how it happens:
For instance, the rental insurance was paid using a check, to see the process that takes place, you should click on the “more” tab followed by selecting “Transactional Journal”.
In the transactional journal tab, you will see the automatic journal entry that happens behind the check.
The check adds credit of $1200 to the checking account and a debit of $1200 in the prepaid insurance account.
Also Read: Quickbooks Premier 2020- Upgrading Accounting Software
How is recurring Journal Entry created in QuickBooks online?
In the example here, we prepaid for a year and you must be wondering how to expense this cost monthly. To do this, another journal entry is created, and here we will credit the prepaid insurance account and will debit the actual insurance expense account.
As for the month of January, the journal entry took $100 from the prepaid insurance asset account and then moved it to the actual insurance expense account. This means it was moved from the balance of sheets to profit and loss. Thus, this journal entry will be performed every month and the process will be automated, making it recurring.
For this, you should click on “make recurring”, at the bottom of the journal entry. This same journal entry will be repeated every month through the end of the year.
Also Read: How to Fix QuickBooks error 6177 permanently
Generating QuickBooks Journal Entry Report
The journal entries can be tracked by creating a report for the records of the QuickBooks Journal Entry. This report is known as the Accountant Journal Report.
The journal reports can be accessed under the reports tab. For running the reports exclusively for journal entries, click on Customise. Make the Journal entry under the transaction type and you can now run the report.
The report can be saved to the computer with all the customization that has been made.
Wrap Up!!
Once you have seen the steps for journal entry, it becomes clear to make and record the QuickBooks Journal Entry. Although QuickBooks can perform these tasks by default, you must know how to do it yourself. So that you can rectify it for errors.
If you face any issues while posting transactions or in managing the books, find help at QuickBooks Support QBS Solved at +1(888) 910 1619. We will answer all your questions.
Also Read:
Resolve QuickBooks update Error 12007 in Easy Steps
Resolve QuickBooks Error 1723- “Windows Installer Package”